2N Set Up
On this page you will find instructions on how to set up a 2N intercom inside Easydom .
To add a 2N intercom to Easydom you must do a part of the set up within and a part in the 2N configuration software.
1 - Open Easydom and click on the three dots at the top right.
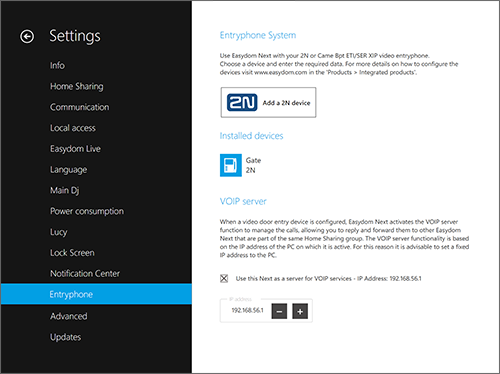
2 - Then enter the Configuration by clicking the gear icon at the bottom right and in the side menu choose the voice "Entryphone"
3 - On this page click on the button "Add a 2N device".
4 - Fill in the form remembering that the IP address required is that of the intercom and that the Switch Code must have an asterisk (*) as the last character.
NB: take note of the Switch Code because it will be useful later in the configuration.
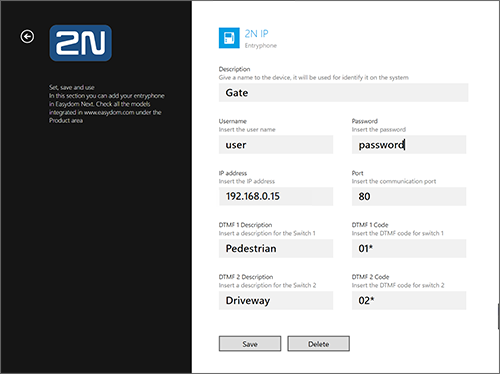
5 - Once the form has been completed click on Save to go back to the "Entryphone" page
6 - Then exit from "Configuration". Easydom asks you to save the changes made, click OK and the system will restart automatically.
The PC where is installed Easydom like VOIP server must have a fixed IP address. Assign it.
Please also set a fixed IP address for the intercom.
Now go to the configuration of the intercom in the 2N software.
7 - Open the browser and enter the IP address of your intercom in the URL bar.
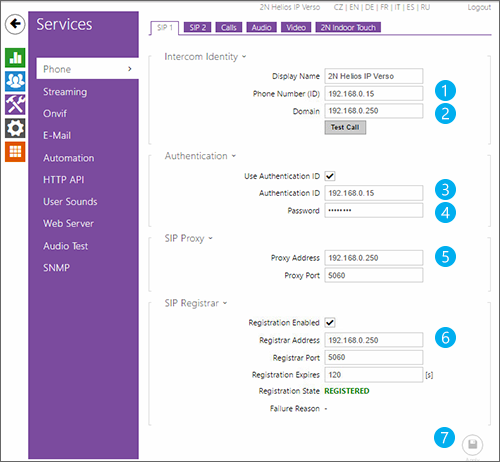
8 - - In the "Service" section look for the "Phone" tab and fill it in all its parts keeping in mind these indications:
- It is the IP address of the entryphone
- It is the IP address of Easydom
- It is the IP address of the entryphone
- It is the Home Sharing code found in the Easydom Configuration
- It is the IP address of Easydom
- It is the IP address of Easydom
- Click "Save" once everything is completed correctly. If the registration is successful, the word "REGISTERED" appears next to the wording "Registration State".
9 - In the "Directory" section in the "Users" tab enter the phone number dialed as follows: sip:999@ + Easydom IP address (es: sip:999@192.168.0.250)
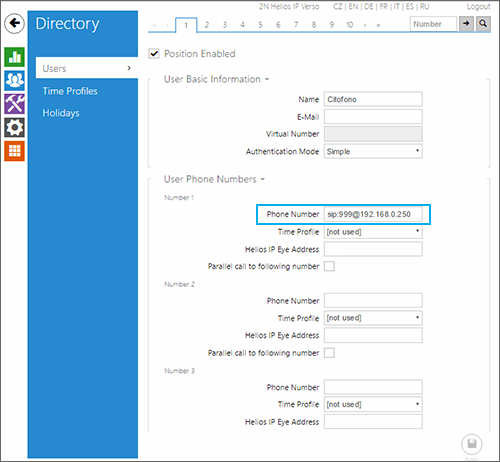
10 - Click "Save" at the bottom right
11 - Back to the "Service" section, look for the "HTTP API" tab and in the Camera API menu select "Unsecure (TCP)" and "None"
This step is to enable the video stream and use 2N as a camera even outside the call.

12 - Click "Save" at the bottom right
13 - In the "Hardware" section of the "Switches" tab, enter in the CODE box the Switch Code you entered in step 4 of this set up
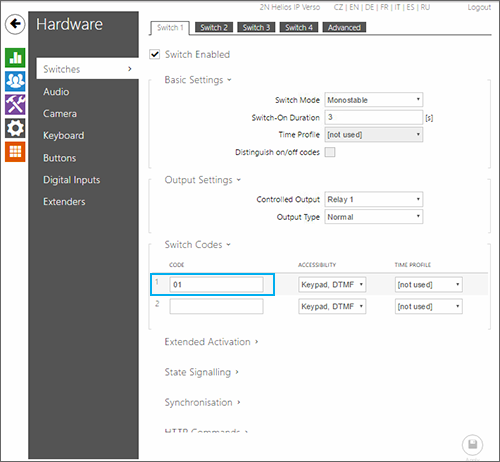
14 - Click "Save" at the bottom right
The set up is concluded and you can use your 2N intercom in Easydom.